Sponsored Links
This blog is dedicated to serve some study techniques that could be very useful for your studies. It doesn't matter whether your subject is Mathemathic, Science, English or any other major subjects, we will help you find someways to easily memorize, solve equations, lessons, and other study stuffs in other ways. Helping you to find that studying is not boring at all but it is really for fun. After all it is your ticket for a better future for you and your own family as well. God bless! |
Pfsense : How to Register Cellphone Wifi Mac Address
Hello fellas, so busy this past few months that i forgot to update my tutorial. But anyways, here I am writing again. On this tutorial you will learn registering cellphone Wi-Fi MAC address to Pfsense. It's very simple and I know you can catch up. All you have to do is follow the images I posted below.


I also made a video for you. Please check it out.
How To Pay NBI Clearance through PayMaya Updated 2018
Hi guys. I just want you to update that this is the updated steps and fee how to pay your NBI Clearance through paymaya. Take note that you need “Paymaya Account” before you continue following the steps I provided. If you haven’t yet started your account, you may go to this link to see how to create one.
1. Log-in to your account. If no account yet register to by downloading Paymaya application via Playstore.
2. You will see this screen after log-in. Click "Menu" icon.
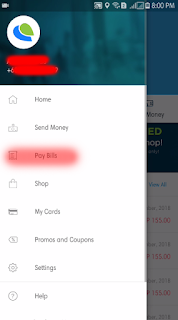
3.Select "Paybills".
4. Scroll up to see the NBI Biller, or you may use the search button and select NBI biller.
5. After selecting NBI Biller, type the Account Number which is the “Reference Number” from confirmed online
appointment, the Amount which 155.00,
disregard the contact, then Select “Continue”.
7. After payment confirmation, Payment
Receipt will appear (see image below) if successfully process.
9. Click CIS Bayad Center Inc. to see the completed payment and at the same time as receipt.
Payment well done. Now you can check your NBI online account if the
status is “Paid”. If the status is
still “Pending” just refresh your
browser until paid status appears.
Just remember the only Account or Reference Number that is accepted to
Paymaya is Bayad Center payment option, others are not. You can cancel your
previous appointment to create a new one.
Thankyou. I hope you’ve learned from this post. Share it if you like. J
How to Disregard Online DFA Appointment 2018
As per DFA 2018 website info, no appointment is needed for the following :
1. Senior Citizen with Senior Citizen ID.
2. Person with Disability (PWDS) with PWD ID or visible disability.
3. Solo Parent with Valid Solo Parent ID.
4. Pregnant Woman with medical certificate.
5. Minors seven years old and below
There is a PRIORITY LANE at DFA Aseana or at any DFA Satellite Office or Regional Consular Office to apply for your passport.
For Overseas Filipino Workers (OFW) with sufficient proof status as iDOLE Card, valid employment contract, work visa may avail of the OFW lane at all consular offices.
This is how to disregard DFA online appointment. But, see to it you have all the requirements needed for your time and effort not to get wasted.
How To Pay NBI Clearance through PayMaya
Are you the one who wants a quick transaction that at home you can pay your bills? Do you know that through Paymaya you can pay your NBI Clearance? No hassle and very fast. To know how. Just follow the step below that I made for you.
1. Log-in to your account. If no account yet register to by downloading Paymaya application via Playstore.
2. Select "Paybills".
Paid Billers will appear.
3. Select your Biller which is NBI.
4. Fill-out information needed. You may leave blank on Contact Number and click "Next"
7. After clicking "Pay" A notification will appear that your payment is already sent.
8. Now, you can view your receipt by goin' "Home" and clicking the latest transaction. The image below is the sample completed transaction sent to the Biller with Reference ID and Receipt No. You may print it out and use to present as receipt.
*Now to see weather your payment is already completed. Visit you NBI account and see if the transaction is in "Paid" status. You may refresh it several times to be updated.
That's all fellas, I hope you've learned from this post and share it with others for their convenience.


