Sponsored Links

This blog is dedicated to serve some study techniques that could be very useful for your studies. It doesn't matter whether your subject is Mathemathic, Science, English or any other major subjects, we will help you find someways to easily memorize, solve equations, lessons, and other study stuffs in other ways. Helping you to find that studying is not boring at all but it is really for fun. After all it is your ticket for a better future for you and your own family as well. God bless!

How to Create 6x9 Template Using QuarkXpress


If a page designer can create his own template therefore I might say that he is professional in lay-outing. If you want to create a 6 x 9 template ".qxp" file here are my step by steps for you.

First open QuarkXpress of any version you are using. (mine version: QuarkXpress 10) You can download this on www.piratebay.com via uTorrent 3.3.1.


Select Project... or simply use Ctrl+N. (Click image to enlarge)


Fill in the layout name, sizes, margins, gutter and then OK. Always set the variables right most especially the width and  height. And since this template is for interior book design. Facing pages, Allow odd pages on left and automatic text box should be check. (Click image to enlarge)


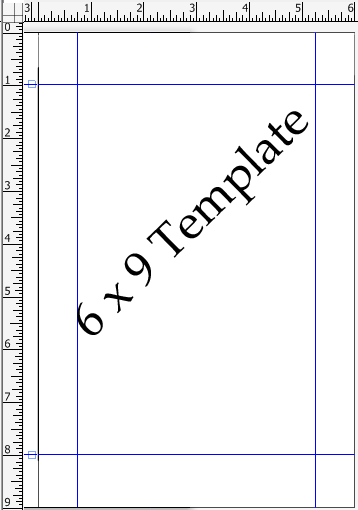
6 x 9 template
Sample of our created 6 x 9 template.
Now you can create any other book sizes just following the steps above.


How to Add Blank Page after Endnotes


Endnotes are sometimes placed at the end of every chapter or at the end of the book which is the last part of the manuscript. If the author placed the endnotes at the end of every chapter it’s a good thing as you don’t need to problem placing blank page after it. But if it is placed at the end of the manuscript and you want to add blank page after endnotes, this will take steps to do so. You cannot just add blank page after the automatic endnotes, unless you do the endnotes manually which is a very poor process and it will take too much time. See image below for an endnotes sample.


During the time I handled to format a book using word 2003 not knowing that there are endnotes at the end of the manuscript. Actually it took me many ours to finish that book. I tried adding blank page by entering as many until 1 page added. See sample below.


The red ¶ as shown in image above are the manual enter I've made until it reach to the next page which I considered as blank page. But when I went to that added page I saw a line above it and in any ways I could not remove the line above the page. See sample below. In fact this can’t be deleted.


Therefore, I need to find ways to solve the problem. And I come up asking my team mates and supervisor if they have any idea. And one suggested that I need to suppress endnotes so that a blank page can be added after it.


Note: Always open the hidden paragraph mark(s) ¶ when doing this.

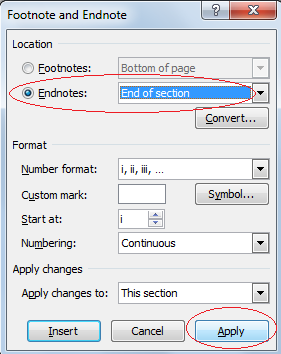
The first step is to go to Endnote section as shown in image below, select Endnotes, End of section then click Apply.


All endnotes will shift after the end of the chapter. As seen in the image below.


Next, Select all the text by pressing Ctrl+A. Go to Page Set Up, pick Layout and click Suppress Endnotes then OK. See image below.


We are almost there. Go to Endnotes section and place a Continuous Page break on endnotes heading. See image below.


Then select Endnotes heading and the paragraph mark (¶) after it. For this we need to uncheck the Suppress Endnotes from Page Setup to move the paragraph mark (¶) into the last line of endnotes. See image below.


As seen in the image we can now add blank page after this paragraph mark (¶) by pressing Alt+B and selecting Page Break. Where done! See how easy adding blank page.

Note: If the page added has header and footer you can remove them by unlinking the page from previous page. Unlike if we do manual entering in the page, we cannot remove the line above that page as said earlier.

I expect you get the idea of adding blank page after automatic endnotes. You can comment questions here. If the process didn’t obtain in one try, please redo the steps and I am grateful to respond any help posted at this time. Thank you and God bless!

How to Use Fillet and Chamfer Command in AutoCAD 2012


In this post we will study on how to use chamfer and fillet command in autocad. First is the chamfer command which look like slicing the edges of corners 45 degrees as shown in Figure 1. 


Figure 1
Figure 1

To use chamfer, type in your command line chamfer or click the chamfer command in your tool bar, after typing or clicking the message will be “Select first line or [Undo/Polyline/Distance/Angle/Trim/Method/ Multiple]:” we need to select the “Distance” by typing the word itself so that we can specify the first chamfer distance and the second chamfer distance then enter.Upon pressing enter, autocad will ask you to “Select the first line or [Undo/Polyline/Distance/Angle/Trim/Method/Multiple]:” all you need to do is just select the first line using your mouse and select also the second line then autocad will chamfered the drawing with a specific distance. 


Figure 2

The next command is fillet, type fillet or “f” in your command line or you can also click it in your tool bar below the chamfer command. Command window message will be Select first object or [Undo/Polyline/Radius/Trim/Multiple]:” since this is the first time you do a fillet command there's no current settings in your fillet command so we need to choose “radius” by typing “r or radius” so that we can input the specific radius of fillet . After typing radius press enter then input the specific radius you want, in my example the radius is 3cm then press enter. The next process is to select the first object to fillet, do this by selecting the first and second line using your mouse (note: the two line to be fillet must be intersecting with each other like shown in Figure 2). The final output will look like Figure 3 which i fillet with a radius of 3cm.


Figure 3


How to Use Tangent Tangent Radius (TTR) Command in Autocad


How to Use Tangent Tangent Radius (TTR) Command in Autocad

In this lesson “How to Use Tangent Tangent Radius (TTR) Command in Autocad” the importance of command TTR will be shown. Here are the steps on how to use tangent tangent command in autocad. 


STEP 1
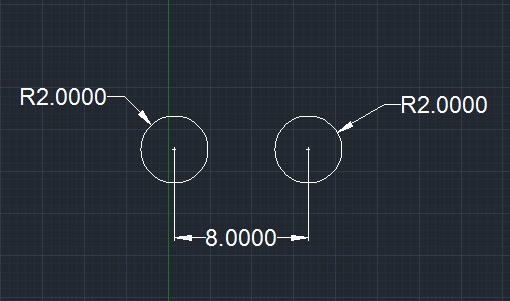
In Figure 1 I created two circles with a radius of 2cm each and the distance between these two circles is 8cm. What I want to perform is to place an arc connecting two circles with radius of 6cm. In command line type circle and there will be a message that you need to specify center point or select 2p/3p & TTR.

Figure 1
Figure 1


STEP 2
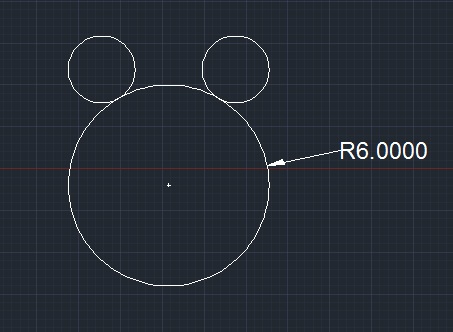
Choose TTR and type it in your command line then you will specify point on object for first tangent of circle and also point on object for second tangent of circle after doing this method you will need to input the specific radius which is 6cm in my example which is shown in Figure 2.

Figure 2
Figure 2


STEP 3
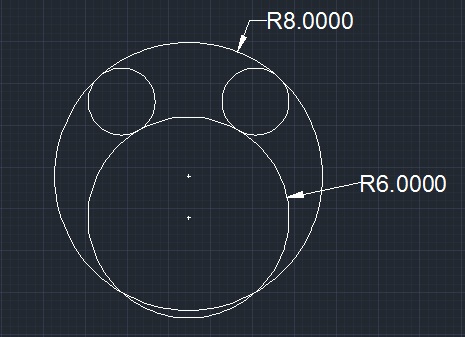
Repeat previous steps in making the circle above the two small circle as shown in Figure 3. (Note: the measurement is base on your drawing)

Figure 3
Figure 3

STEP 4
We need to trim down unnecessary lines by using trim command to attain the final drawing output. Here’s how to used trim:

Type trim in your command line, the autocad will ask you to select the object or select all to trim. Type all in your command line to select all drawings in autocad then enter; and click excess circles and line then enter again. The final output will look like Figure 4.

Figure 4
Figure 4


How to Study Inequalities

INEQUALITIES


a > b if "a-b" is a "+" number

a < b if "a-b" is a "-" number

Fundamental Properties
1) An inequality is unchanged in sense if the same number is added or subtracted from both sides.
a > b
a + c > b + c
a - c > b - c

2) An inequality is unchanged in sense if both sides are multiplied or both divided by the same positive number.
3 > 1
(1/3) 3 > 1 (1/3)
1 > 1/3

3) An inequality is changed in sense if both sides are both multiplied or divided a negative number.
3 > 1
-1(3) > (1) - 1
-3 < -1

4) An inequality of positive quantities is unchanged in sense if the same positive power or positive root each side is taken.
3 > 2
32 > 22
9 > 4
25 < 49
251/2 > 491/2
25 < 7

5) If the first of the three quantities is greater than the second, and the second is greater than the third, then the first is greatre than the third.
if  a > b
    b > c , then a > c

6) If inequalities are added to unequals in the same order, the sums are unequal in the same order.
a < b
c > d

  a < b
+d < c
a + d < b + c

7) If unequals are subtracted from equals, the results are unequal, the result are unequal in the opposite order.
a > b        c = d        5 > 3       9 = 9

  c = d
- a > b
c - < d - b

  9 = 9
- 5 > 3
9 - 5 < 9 - 3

8) If a > b ≥ c and c > d ≥ 0, then ac > bd.
* 7 > 3 > 1 , 1 > 1/2 > 0
   7 (1) > 3(1/2)
   7 > 1.5

9) If a, b, c are positive, then a+ b2 + c2 > ab + ac + bc.

72 + 32 + 12 > 7(3) + 3(1)
49 + 9 + 1 > 21 + 7 + 3
51 > 31


Example: Find the values of "x" for which 2 (3x-4) > (7x/2 + 2).

Solution:
2 (3x-4) > (7x/2 + 2)
-7x (6x-8) > (7x + 4) - 7x
 -x -8 > 4
-1 (-x) > (12) - 1
x < -12

Therefore: x = { set of real nos. < -12}


Tell us about this post. We want to hear any comments, suggestions from our viewers.


How to Write a Simple Poem


Want to know how to write a simple poem? Even though it’s a simple poem, it also requires brilliant thoughts and with a good set on language and good presentation of skills. Writing poem is quite a scary task, although its sounds simple at the start, but when you give a try its turns into something you don’t know how to end. But once you’ve written a poem, it makes yourself proud. Many of us can create a perfect flow with words, while it is a wordy and heavy task for others.

There are several things that you must consider while thinking how to write a poem or poetry. Here is a list you must consider.

Subject or Theme
This is the key and the starting point of your work.

The Feeling
What do you feels when writing the poem shouldn’t be obvious. With your words you have to express what you feel, and the emotions in yourself.

The Poet (Your) Mood
What do you want to show your ideas or feelings in the poem you want to write? What kind of poem you desire to write. Once you have thoughts in mind, you can write a phrases or sentence that contains what in your mind.

The Poet (Your) Style
Pick what style of writing your poem. It maybe modern, classical and old-school. 


Here are samples of poem from famous poets.

A Fairy Song
William Shakespeare

Over hill, over dale,
Thorough bush, thorough brier,
Over park, over pale,
Thorough flood, thorough fire!
I do wander everywhere,
Swifter than the moon's sphere;
And I serve the Fairy Queen,
To dew her orbs upon the green;
The cowslips tall her pensioners be;
In their gold coats spots you see;
Those be rubies, fairy favours;
In those freckles live their savours;
I must go seek some dewdrops here,
And hang a pearl in every cowslip's ear.


When You are Old
William Butler Yeats

WHEN you are old and gray and full of sleep
And nodding by the fire, take down this book,
And slowly read, and dream of the soft look
Your eyes had once, and of their shadows deep;

How many loved your moments of glad grace,
And loved your beauty with love false or true;
But one man loved the pilgrim soul in you,
And loved the sorrows of your changing face.

And bending down beside the glowing bars,
Murmur, a little sadly, how love fled
And paced upon the mountains overhead,
And hid his face amid a crowd of stars.


The Arrow and the Song
Henry Wadsworth Longfellow

I shot an arrow into the air,
It fell to earth, I knew not where;
For, so swiftly it flew, the sight
Could not follow it in its flight.

I breathed a song into the air,
It fell to earth, I knew not where;
For who has sight so keen and strong,
That it can follow the flight of song?

Long, long afterward, in an oak
I found the arrow, still unbroke;
And the song, from beginning to end,
I found again in the heart of a friend.

After reading this blog, you can create your own poem. Post your created poem here...


Design by Free WordPress Themes | Bloggerized by Lasantha - Premium Blogger Themes | Bluehost Review