Sponsored Links

This blog is dedicated to serve some study techniques that could be very useful for your studies. It doesn't matter whether your subject is Mathemathic, Science, English or any other major subjects, we will help you find someways to easily memorize, solve equations, lessons, and other study stuffs in other ways. Helping you to find that studying is not boring at all but it is really for fun. After all it is your ticket for a better future for you and your own family as well. God bless!

How To Renew NBI Online Updated 2018


This is the updated steps on how to register to RENEW NBI online with "Delivery Option".
(Note: Make sure you have an email address.)

1. Log on to www.clearance.nbi.gov.ph/
Important question to answer before you proceed renewing your NBI : DO YOU HAVE AN OLD NBI CLEARANCE? (Applicable only on 2014-2016 NBI Clearances). If none, Click this link on How To Register NBI Clearance New online. If yes, please follow the following steps.


3. Fill-out the information needed.
Make sure you enter the "correct" information. The click "Proceed"

4. Enter valid email address and your password. Accept terms of service then Sign Up.

5. Sign in using your valid email address and password. 

***Good news because you don't need to fill-out the information needed. NBI already saved your data from 2014 to 2016.  

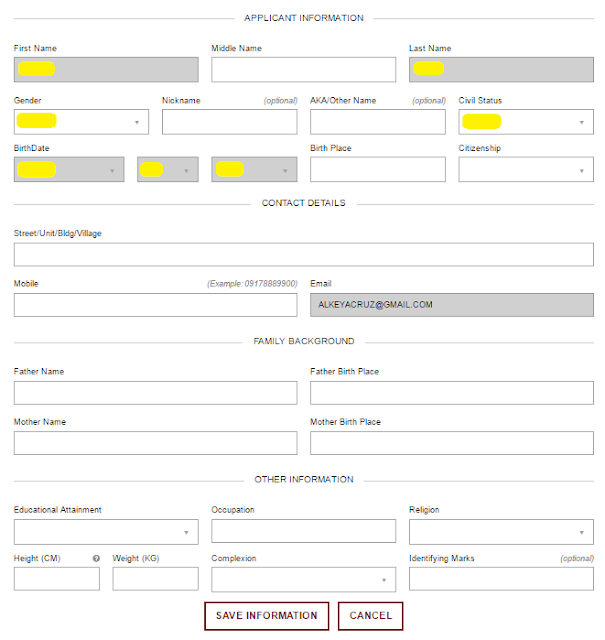
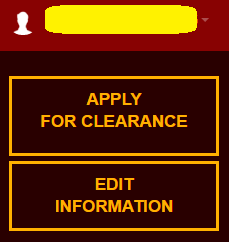
6. You may check your information. If there is a need to edit click "Edit Information"
To continue, on right side menu click "Apply for Clearance".

7. Fill-out the ID you will present. Then click "I Agree"

***Another good news, NBI Clearance renew already have "Delivery Options". It's up to you if you want "Pick up or Delivery" 


FOR PICK UP CONTINUE WITH THE FOLLOWING INSTRUCTIONS:

8. Select "Branch and Date",

9. No need to select purpose since NBI updated it to "MULTI-PURPOSE CLEARANCE" as default.


10. And to complete your online appointment you must select your "Payment Option". 


14. Then you have to confirm your Payment. After confirming, Transaction Summary will appear as shown image below:


15. Click "Proceed Payment".

You will now have a "Reference Number" as shown image above. (Note:Reference Number above is just a sample. Please do not copy). You may right your "Reference Number" and Go to the nearest BAYAD CENTER or LBC (for Bayad Center Option) and pay using your "Reference Number".

Your Reference Number is important. This will serve as your entry pass when getting your NBI Clerance to NBI branches.


How To Set DFA Passport Appointment Online

Here's the steps on how to set DFA passport appointment online.
1. Log on to https://www.passport.gov.ph
2. Select "Schedule an Appointment"
3. Check "I have read and understood the instructions and information on this page, and agree to the Terms and Conditions on the use of this online appointment and scheduling system."
4. Click "Start Individual Appointment"
5. Fill-out or select the information needed. See below sample:


Office Name, Office Address and Contact Number will automatically be updated once you select the "Site" were you wanted to register.

6. Click "Next"
7. Set your "Date and Time".

8. Click "Next"
9. Fill out all "Personal Information" needed.

9. Click "Next"
10.  Fill out all "Family Information" needed.

11. Click "Next"
12. Fill out "Application Information" needed.

13.Click "Next"
14. Fill out "Contact Information" needed.

15. Click "Next"
16. Confirm Your Application by checking "I am not a robot" and "I am aware that possession..."
17. Select "Confirm"
18. DFA will send a link to your email address. See below sample:
19. You have to confirm it by clicking "here" on Please confirm your chosen appointed by
clicking here.

20. Then Copy and Paste from your email and supply it to "Appointment Code" box and also you have to enter the email address use and Check "I'm not a robot".  See below sample.

 After it you can now download your application form in three pages. Please print it in A4 paper.

How To Register To NBI Online

How To Register To NBI Online

This is the updated steps on how to register to NBI online for  first timer.
(Note: Make sure you have an email address.)

1. Log on to www.nbi-clearance.com
2. Supply the information needed, then Sign up.

3. Fill-out the information needed.
Make sure you enter the "correct" information. The click "Yes"
4. After the registration. Sign in using your email address and password. 

5. Fill-out the information needed then "Save".

6. Double check your information. If there is a need to edit click "Edit Information" (as shown image below), if none you may proceed by clicking "Apply For Clearance". 

7.  Then you have to Add what ID you will present. And then click "I Agree"
 

8. Select "Branch and Date",

9. Select "Purpose" and "Purpose Detail".
 

10. And to complete your online appointment you must select your "Payment Option".


14. Then you have to confirm your Payment. After confirming, Transaction Summary will appear as shown image below:


15. Click "Proceed Payment".

You will now have a "Reference Number" as shown image above. (Note:Reference Number above is just a sample. Please do not copy). You may right your "Reference Number" and Go to the nearest BAYAD CENTER or LBC (for Bayad Center Option) and pay using your "Reference Number".

Your Reference Number is important. This will serve as your entry pass when getting your NBI Clerance to NBI branches.

*For Payment Instruction, click "Payment Instruction" as shown image below.


This is the sample "Payment Instruction"

How to Create 6x9 Template Using QuarkXpress


If a page designer can create his own template therefore I might say that he is professional in lay-outing. If you want to create a 6 x 9 template ".qxp" file here are my step by steps for you.

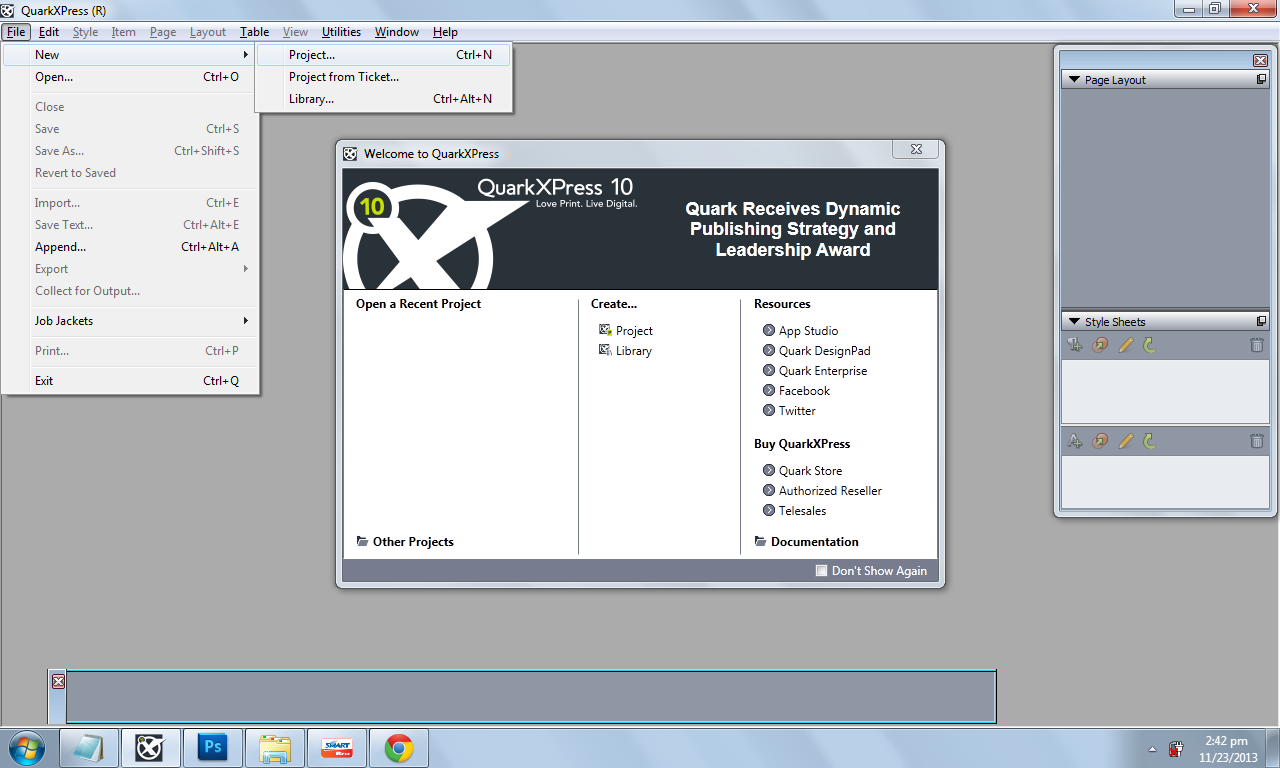
First open QuarkXpress of any version you are using. (mine version: QuarkXpress 10) You can download this on www.piratebay.com via uTorrent 3.3.1.


Select Project... or simply use Ctrl+N. (Click image to enlarge)


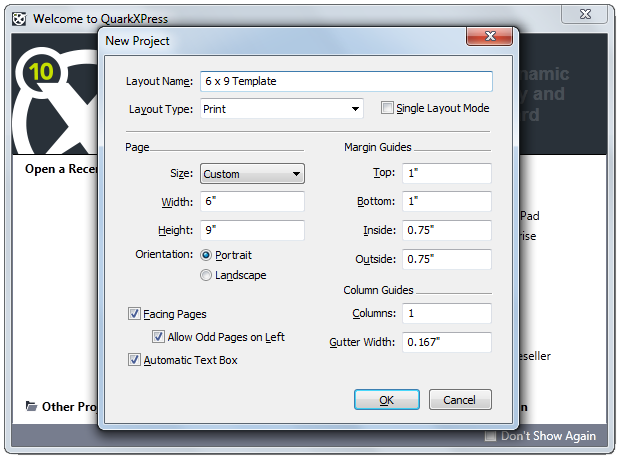
Fill in the layout name, sizes, margins, gutter and then OK. Always set the variables right most especially the width and  height. And since this template is for interior book design. Facing pages, Allow odd pages on left and automatic text box should be check. (Click image to enlarge)


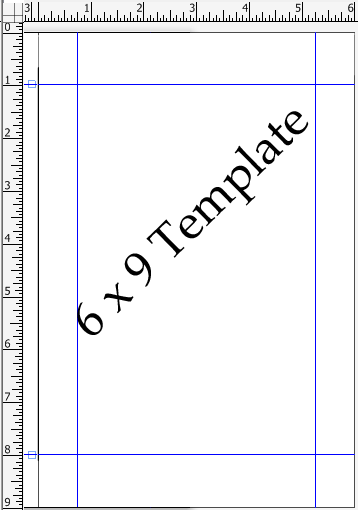
6 x 9 template
Sample of our created 6 x 9 template.
Now you can create any other book sizes just following the steps above.


How to Add Blank Page after Endnotes


Endnotes are sometimes placed at the end of every chapter or at the end of the book which is the last part of the manuscript. If the author placed the endnotes at the end of every chapter it’s a good thing as you don’t need to problem placing blank page after it. But if it is placed at the end of the manuscript and you want to add blank page after endnotes, this will take steps to do so. You cannot just add blank page after the automatic endnotes, unless you do the endnotes manually which is a very poor process and it will take too much time. See image below for an endnotes sample.


During the time I handled to format a book using word 2003 not knowing that there are endnotes at the end of the manuscript. Actually it took me many ours to finish that book. I tried adding blank page by entering as many until 1 page added. See sample below.


The red ¶ as shown in image above are the manual enter I've made until it reach to the next page which I considered as blank page. But when I went to that added page I saw a line above it and in any ways I could not remove the line above the page. See sample below. In fact this can’t be deleted.


Therefore, I need to find ways to solve the problem. And I come up asking my team mates and supervisor if they have any idea. And one suggested that I need to suppress endnotes so that a blank page can be added after it.


Note: Always open the hidden paragraph mark(s) ¶ when doing this.

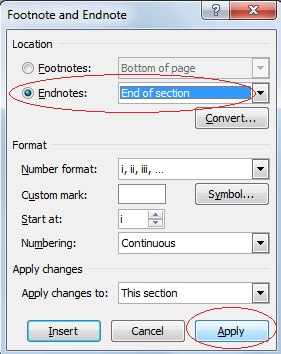
The first step is to go to Endnote section as shown in image below, select Endnotes, End of section then click Apply.


All endnotes will shift after the end of the chapter. As seen in the image below.


Next, Select all the text by pressing Ctrl+A. Go to Page Set Up, pick Layout and click Suppress Endnotes then OK. See image below.


We are almost there. Go to Endnotes section and place a Continuous Page break on endnotes heading. See image below.


Then select Endnotes heading and the paragraph mark (¶) after it. For this we need to uncheck the Suppress Endnotes from Page Setup to move the paragraph mark (¶) into the last line of endnotes. See image below.


As seen in the image we can now add blank page after this paragraph mark (¶) by pressing Alt+B and selecting Page Break. Where done! See how easy adding blank page.

Note: If the page added has header and footer you can remove them by unlinking the page from previous page. Unlike if we do manual entering in the page, we cannot remove the line above that page as said earlier.

I expect you get the idea of adding blank page after automatic endnotes. You can comment questions here. If the process didn’t obtain in one try, please redo the steps and I am grateful to respond any help posted at this time. Thank you and God bless!

How to Use Fillet and Chamfer Command in AutoCAD 2012


In this post we will study on how to use chamfer and fillet command in autocad. First is the chamfer command which look like slicing the edges of corners 45 degrees as shown in Figure 1. 


Figure 1
Figure 1

To use chamfer, type in your command line chamfer or click the chamfer command in your tool bar, after typing or clicking the message will be “Select first line or [Undo/Polyline/Distance/Angle/Trim/Method/ Multiple]:” we need to select the “Distance” by typing the word itself so that we can specify the first chamfer distance and the second chamfer distance then enter.Upon pressing enter, autocad will ask you to “Select the first line or [Undo/Polyline/Distance/Angle/Trim/Method/Multiple]:” all you need to do is just select the first line using your mouse and select also the second line then autocad will chamfered the drawing with a specific distance. 


Figure 2

The next command is fillet, type fillet or “f” in your command line or you can also click it in your tool bar below the chamfer command. Command window message will be Select first object or [Undo/Polyline/Radius/Trim/Multiple]:” since this is the first time you do a fillet command there's no current settings in your fillet command so we need to choose “radius” by typing “r or radius” so that we can input the specific radius of fillet . After typing radius press enter then input the specific radius you want, in my example the radius is 3cm then press enter. The next process is to select the first object to fillet, do this by selecting the first and second line using your mouse (note: the two line to be fillet must be intersecting with each other like shown in Figure 2). The final output will look like Figure 3 which i fillet with a radius of 3cm.


Figure 3


Design by Free WordPress Themes | Bloggerized by Lasantha - Premium Blogger Themes | Bluehost Review